Jest | 替測試設置分類(describe)及作用域(scoping)
前言
關於 describe ,在進行測試時其實是很基本的分類,但是因為 describe 牽扯到了作用域,而在作用域內的 beforeAll 和 afterAll 等 Function 又和 async 異步測試有關,所以本篇文章的內容可能會需要先了解「Unit Test | 跨越同步執行的 Jest 測試」裡所提到的幾個用法,如果有任何問題再麻煩留言告訴我,謝謝!
describe
在講解之前,可以先看一些基本的測試:
const sum = (x = 0, y = 0) => {
    return (isNaN(x) ? 0 : x) + (isNaN(y) ? 0 : y)
}

const square = (x = 0) => {
    let intX = isNaN(x) ? 0 : x
    return intX * intX
}

test('Test default return zero', () => {
    expect(sum()).toBe(0)
})

test('Test 3 plus 5 is 8', () => {
    expect(sum(3, 5)).toBe(8)
})

test('Pass when value is NaN can return zero', () => {
    expect(sum(NaN, NaN)).not.toBeNaN()
})

test('Pass 3 can return 9', () => {
    expect(square(3)).toBe(9)
})

test('Pass when value is String can return zero', () => {
    expect(square('efg')).toBe(0)
})
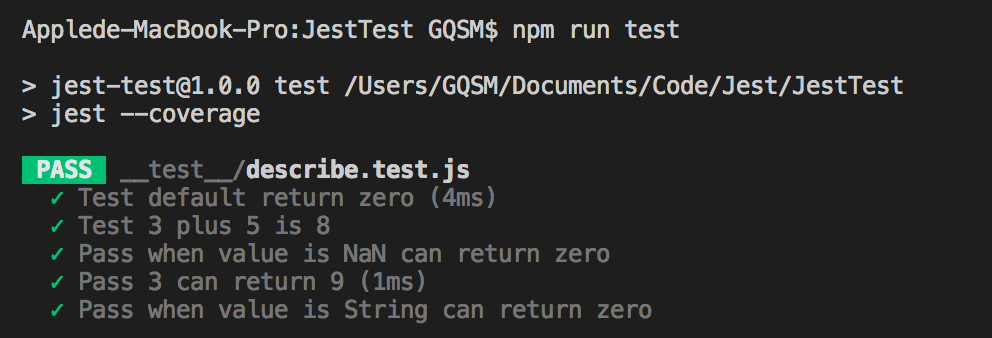
上方對 sum 做了三次測試, square 做了一次,通過測試後得到了 PASS 的結果:

所有的測試內容都會條列顯示,雖然可以清楚的知道在每一項測試中做了什麼事情,但卻無法曉得該測試是對哪個 Function 做的,而就一般來說,測試檔案裡也不會只需測試一個 Function 而已。
因此,需要把測試用 describe 分類,讓測試者可以一眼就能知道哪些測試內容是對哪個 Function 使用。
describe 的使用方法很簡單,就像 test 一樣,它會接收兩個參數,第一個是對 describe 的描述,第二個是 Function ,屬於此 describe 的 test 都放在該 Function 中。
將上方的例子做分類會得到:
/*函式部份省略*/

describe('Test sum', () => {
    test('Test default return zero', () => {
        expect(sum()).toBe(0)
    })

    test('Test 3 plus 5 is 8', () => {
        expect(sum(3, 5)).toBe(8)
    })

    test('Pass when value is NaN can return zero', () => {
        expect(sum(NaN, NaN)).not.toBeNaN()
    })
})

describe('Test square', () => {
    test('Pass 3 can return 9', () => {
        expect(square(3)).toBe(9)
    })

    test('Pass when value is String can return zero', () => {
        expect(square('efg')).toBe(0)
    })
})
經過分類後再進行測試,會更清楚每一項測試是在哪個 Function 身上:

scoping
每個 .test.js 測試檔案的內容就如一般的 JavaScript ,依照 Function 的範圍分成全域及區域的執行。
在測試中,執行範圍會影響到的除了變數外還有另外幾個 Jest 提供的函式:
beforeAll:所在區域內會第一個執行。beforeEach:每一次的測試前會先執行。afterAll:所在區域內最後一個執行。afterEach:每一次的測試後會馬上執行。
可由以下例子更清楚它們的執行順序:
beforeAll(() => { console.log('全域 beforeAll :全域的第一個順序執行') })
beforeEach(()=>{console.log('全域 beforeEach :每次測試前都會執行,優先度大於區域的')})
afterAll(() => { console.log('全域 afterAll :全域的最後一個順序執行') })
afterEach(()=>{console.log('全域 afterEach :每次測試後都會執行,優先度低於區域的')})

describe('Test', () => {
    beforeAll(() => { console.log('區域 beforeAll :區域的第一個順序執行') })
    beforeEach(()=>{console.log('區域 beforeEach :每次測試前都會執行,優先度低於全域的')})
    afterAll(() => { console.log('區域 afterAll :區域的最後一個順序執行') })
    afterEach(()=>{console.log('區域 afterEach :每次測試後都會執行,優先度大於全域的')})

    test('Test1', () => {
        expect(true).toBe(true)
    })

    test('Test1', () => {
        expect(3).toBe(3)
    })
})
執行結果:

beforeAll 和 afterAll 一定是全域和區域內的第一個執行,而 beforeEach 和 afterEach 則會夾住 test ,分別會在單一測試的前後執行,只要記住全域的 before 一定是最先, after 是最後。
在測試裡,可以利用 beforeAll 或 beforeEach 初建立測試資料,並在測試完後以 afterAll 或 afterEach 將資料給移除。
接著透過實際運用來理解這四個函式的使用方法:
//模擬資料庫的資料
const userDB = [
    { id: 1, name: '小明' },
    { id: 2, name: '小華' },
]

//新增測試資料
const insertTestData = data => {
    userDB.push(data)
}

//移除測試資料
const deleteTestData = id => {
    let findIndex = userDB.findIndex((user) => {
        return user.id === id
    })
    if (findIndex !== -1)
        userDB.splice(findIndex, 1)
}

//查詢測試資料
const getUserData = id => {
    let goalData = userDB.find((user) => {
        return user.id === id
    })
    return goalData
}

//全部測試完後確認資料狀態
afterAll(() => {
    console.log(userDB)
})

describe('Test about user data', () => {

    //開始前新增測試資料
    beforeAll(() => {
        insertTestData({ id: 99, name: '測試人員' })
    })
    //結束時清除測試資料
    afterAll(() => {
        deleteTestData(99)
    })

    //確認是否回傳正確的資料
    test('Test get user data', () => {
        expect(getUserData(99)).toEqual({ id: 99, name: '測試人員' })
    })

})
上方例子使用 userDB 模擬資料庫的資料,並在測試前透過 beforeAll 新增一筆測試資料,測試完後再以 afterAll 將測試資料清除,最後利用全域 afterAll 最後執行的特性確認 userDB 是否回到初始狀態:

既然是模擬資料庫,一定會有一些延遲時間,所以替 insertTestData 增加 setTimeout :
//在新增測試資料增加 Timeout
const insertTestData = data=> {
    setTimeout(() => {
        userDB.push(data)
    },3000)
}
其餘不變的狀況下再進行測試一次:

因為 Timeout 延遲的關係,對 getUserData 執行測試的時候,測試資料還沒有被 push 進 userDB 裡面,因此在找不到資料的情況下函式就回傳 undefined ,這個結果並不是測試所期望的。
在 beforeAll 等函數中,處理異步執行有幾種方法:
第一種是當 insertTestData 中含有 callBack 函式時,可以使用 done 來設置 beforeAll 的完成點,只要沒有執行到 done 就不會離開 beforeAll ,例如將 insertTestData 和 beforeAll 改成下方:
//傳入 done 參數
beforeAll(done => {
    //callBack 函式,會在 Timeout 後執行
    const callBack = () => {
        //當執行完 Timeout ,進入 callBack 後就能結束
        done()
    }

    //將 callBack 函式傳入 insertTestData
    insertTestData({ id: 99, name: '測試人員' }, callBack)
})
這麼一來,就能確保是在新增資料後才會接著測試,結果就會正確。
第二個方式是,在 insertTestData 本身就回傳一個 Promise 物件的情況,只需要在 beforeAll 中回傳從 insertTestData得到的 Promise 就可以了:
beforeAll(() => {
    //藉由 return 接收到的 Promise 處理異步請求
    return insertTestData({ id: 99, name: '測試人員' })
})
上方的兩種方式都能為 beforeAll 等函式處理同步執行產生的問題,得到結果也相同,測試過程當然就不會出錯!
關於處理同步執行更詳細說明可以參考「Unit Test | 跨越同步執行的 Jest 測試」,裡面會有更清楚的例子。
本篇文章主要是在整理測試的程式內容,能夠使用 describe 為相同函式的測試內容做分類,並使用 beforeAll 、 afterAll 、 beforeEach 、 afterEach 等函式建構及清除測試環境。
如果文章中有任何問題,或是不理解的地方,都可以留言告訴我!謝謝大家!
參考文章